The fastest way to handle a step to stl conversion is an in-browser WebAssembly converter that runs OpenCASCADE locally — no upload, no account, no wait. Drop your .step or .stp file in, pick binary STL, and you're done in seconds. Two solid alternatives exist depending on your situation:
- In-browser converter (polyd.com, convert3d.org, or similar): instant, private, no install — best for single parts and quick iterations
- FreeCAD or MeshInspector: free desktop tools that give you explicit tessellation controls and handle large assemblies without file-size caps
- Availzye Machinist Pro: an integrated CAD viewer with STEP-to-STL conversion built into a managed shop workflow, with role-based access and audit logs
One caveat before you print anything: mesh quality depends entirely on tessellation settings and unit handling. Check both before you export.
Table of Contents
- How do you convert a STEP file to STL in a browser?
- How to convert STEP files offline with desktop tools
- What actually happens during STEP to STL conversion?
- Should you upload your STEP files or convert locally?
- Common conversion problems and how to fix them
- When should you keep the STEP file instead of relying on STL?
- Availzye Machinist Pro keeps your STEP files and conversions inside the shop
- Key Takeaways
- The part most guides skip about STEP to STL
- Try Availzye Machinist Pro for your next STEP conversion
- Useful sources for deeper reference
- Availzye Machinist Pro: the integrated solution for shop-grade conversions
How do you convert a STEP file to STL in a browser?
Open your converter of choice — step-to-stl.com is a clean example — and follow these steps:
- Click "Open File" and select your .step or .stp file.
- The browser downloads a WebAssembly CAD engine on first use (a one-time moderate download), then tessellates your geometry locally.
- Select Binary STL as the output format. Binary is smaller and faster for slicers than ASCII.
- If the tool exposes tessellation controls, reduce linear deviation for smoother curves on organic shapes.
- Check the 3D preview. Curved faces should look smooth, not faceted. If they look like a soccer ball, tighten the deviation setting.
- Click download. Your STL is ready.
Because the CAD kernel runs entirely in your browser, nothing is sent to a server. Conversion typically completes in under a second for typical parts once the engine is cached. Some browser-mode tools have file-size caps, so very large assemblies may need a desktop tool instead.
Pro Tip: Before downloading, zoom into curved surfaces in the preview. If you can count the triangles on a fillet, your linear deviation is too coarse — tighten it one step and re-check.
How to convert STEP files offline with desktop tools
Desktop tools give you more control over tessellation, assembly handling, and mesh repair. Use this workflow:
- Set tessellation parameters before exporting. In FreeCAD, go to Edit → Preferences → Import/Export and adjust the mesh deviation. In MeshInspector, you can set linear and angular deviation directly in the export dialog.
PrusaSlicer can import some STEP files directly, which skips the manual export step entirely for simple parts. For complex assemblies or parts with tight tolerances, the explicit FreeCAD or MeshInspector route gives you more visibility into what the mesh actually looks like before it reaches the printer. Desktop tools also have no file-size ceiling, which matters when you're working with multi-part assemblies that exceed browser-mode limits.
What actually happens during STEP to STL conversion?
STEP files store exact B-Rep (boundary representation) geometry — mathematically precise surfaces and edges governed by ISO 10303-21. STL stores a triangle mesh. The conversion is tessellation: the CAD kernel samples those smooth surfaces into flat triangles, which is an approximation. How close that approximation gets to the original depends entirely on two parameters.
Linear deflection sets the maximum distance between the original surface and the nearest triangle edge. Smaller values produce more triangles and smoother curves. Angular deflection limits the maximum angle between adjacent triangle normals, which controls how well the mesh captures tight curves and small radii. Both are explained in detail in OpenCASCADE's deflection documentation.
| Setting | Value | Result |
|---|---|---|
| Linear deviation | — | Small file, visible faceting on curves |
| Linear deviation | 0.1 mm (medium) | Balanced — good for FDM printing |
| Linear deviation | 0.01 mm (fine) | Large file, smooth curves for SLA/resin |
| Angular deviation | — | Flat-looking fillets |
| Angular deviation | 5° (fine) | Smooth fillets, larger file |
| Output format | ASCII STL | Human-readable, larger, slower for slicers |
| Output format | Binary STL | Compact, faster to parse, preferred for production |
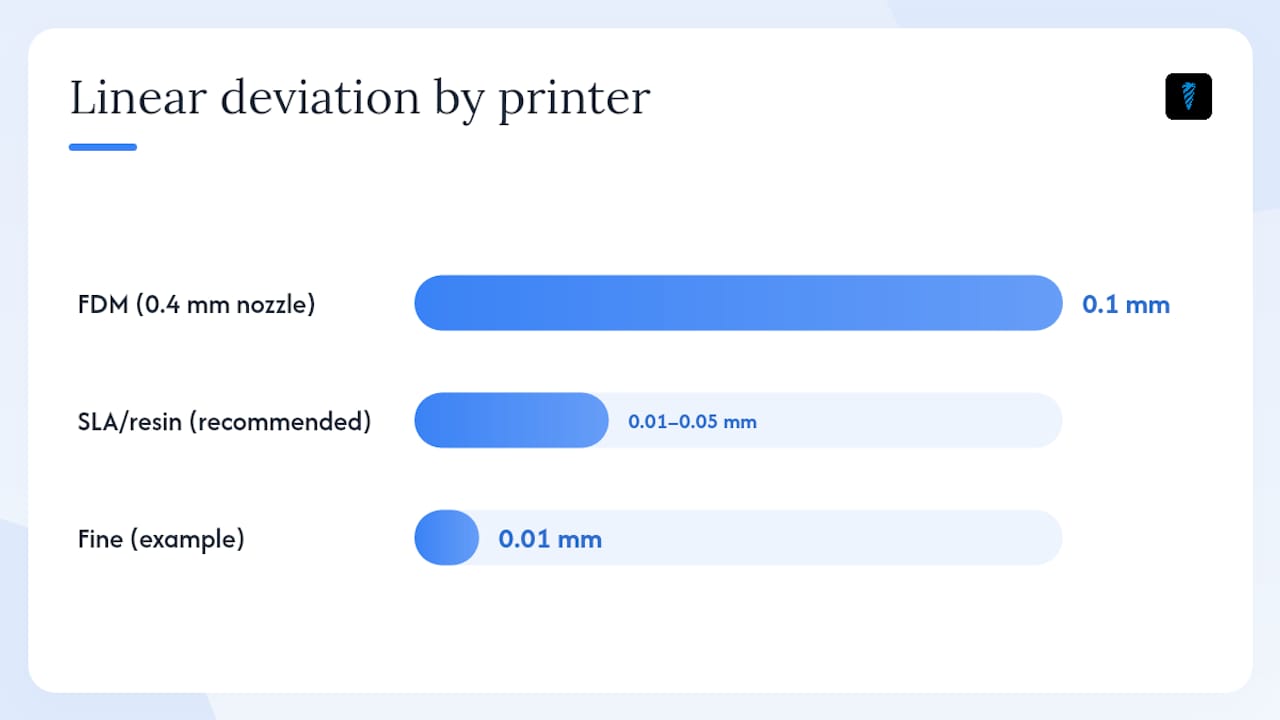
Match your linear deviation to your printer's layer height or nozzle diameter. For a 0.4 mm FDM nozzle, 0.1 mm linear deviation is more than sufficient. For SLA or high-resolution resin printing, drop to 0.01–0.05 mm. Going finer than your printer can resolve just inflates file size with no visible benefit.
Pro Tip: Always export binary STL for production. ASCII STL files can be 5–6× larger for the same geometry, and some slicers handle large ASCII files slowly or inconsistently.
Should you upload your STEP files or convert locally?
The answer depends on what's in the file. For a hobby bracket or a public-domain part, uploading to a server-side converter is fine. For anything under NDA, a customer part, or proprietary tooling geometry, local conversion is the only sensible choice.
Here's what to check before using any converter:
- Does the tool run a local CAD kernel? Look for explicit "no upload" or "in-browser" language. Tools like 3D AI Studio's converter state clearly that parsing and conversion happen locally.
- Are files transmitted to a server? — Check the privacy policy or network tab in your browser's dev tools if you're unsure.
For shops handling customer parts, the cleanest solution is an integrated platform that keeps files inside your team's ecosystem entirely. Uploading a customer's proprietary geometry to a free web tool to save two minutes is a risk most shops can't justify.
Pro Tip: If your shop has an NDA policy, write "local conversion only" into your CAD file handling checklist. It takes one line to add and prevents a policy violation that's hard to undo.
Common conversion problems and how to fix them
Most print failures that trace back to conversion fall into a short list of repeatable problems.
- Missing faces or holes in the mesh — Usually caused by degenerate faces in the original STEP or a tolerance mismatch during tessellation. Fix: run MeshLab's "Close Holes" filter or use MeshInspector's mesh-healing feature before slicing.
Run a printability check in PrusaSlicer or Cura after every conversion. Both flag thin walls, non-manifold geometry, and overhangs before you commit to a print.
When should you keep the STEP file instead of relying on STL?
Keep the STEP. Always. STL is a downstream export for a specific print job, not an engineering record.
- CAM operations: CNC toolpaths generated from STL meshes are less accurate than those from STEP surfaces. If the part will ever be machined, the STEP is the authoritative source. Pairing your CAD files with a solid-modeling workflow keeps that source clean.
Never treat an STL as the authoritative engineering file. It is a snapshot of one tessellation at one tolerance setting.
Availzye Machinist Pro keeps your STEP files and conversions inside the shop
Free online converters work fine for one-off parts. But when you're running a shop with multiple machinists, customer files, and revision histories, ad-hoc web tools create version control gaps and IP exposure that compound over time.
Availzye Machinist Pro includes a built-in CAD viewer with STEP-to-STL conversion that keeps everything inside your team's managed environment:
- Conversion runs in-app, no external upload required
- Role-based access controls who can view, export, or modify CAD files
- Audit logs track every export with timestamp and user
- Binary STL output is compatible with PrusaSlicer, Cura, and other major slicers
- CAD files stay versioned alongside job records, shift notes, and tool data
From there, exported STLs connect directly to the G-code generator for an end-to-end workflow from STEP geometry to machine-ready output. Plans start at $9.99/month with a 7-day free trial. Open the CAD Viewer and run a conversion on your next part to see how it fits your workflow.
Key Takeaways
The fastest, most private STEP to STL conversion uses an in-browser WebAssembly converter running OpenCASCADE locally, but tessellation settings and unit checks determine whether the output is actually print-ready.
| Point | Details |
|---|---|
| Pick the right tool | Use in-browser converters for speed, FreeCAD or MeshInspector for assemblies and control. |
| Tessellation controls print quality | Linear deviation settings vary by printer type; coarser settings suit typical FDM printers, while finer settings improve quality for high-resolution resin printing. |
| Binary STL is the standard | Binary STL is smaller and faster for slicers; always prefer it over ASCII for production. |
| Local conversion protects IP | In-browser WebAssembly tools keep geometry off servers — required for NDA'd or customer parts. |
| Availzye Machinist Pro for shop workflows | Built-in STEP-to-STL conversion with audit logs, role-based access, and G-code integration. |
The part most guides skip about STEP to STL
The conversion itself is trivial. The part that actually costs shops time and money is what happens after: a mesh that looks fine in a viewer but fails mid-print because nobody checked the bounding box, or a file that gets emailed to a vendor as an STL when the STEP was the document that should have been controlled.
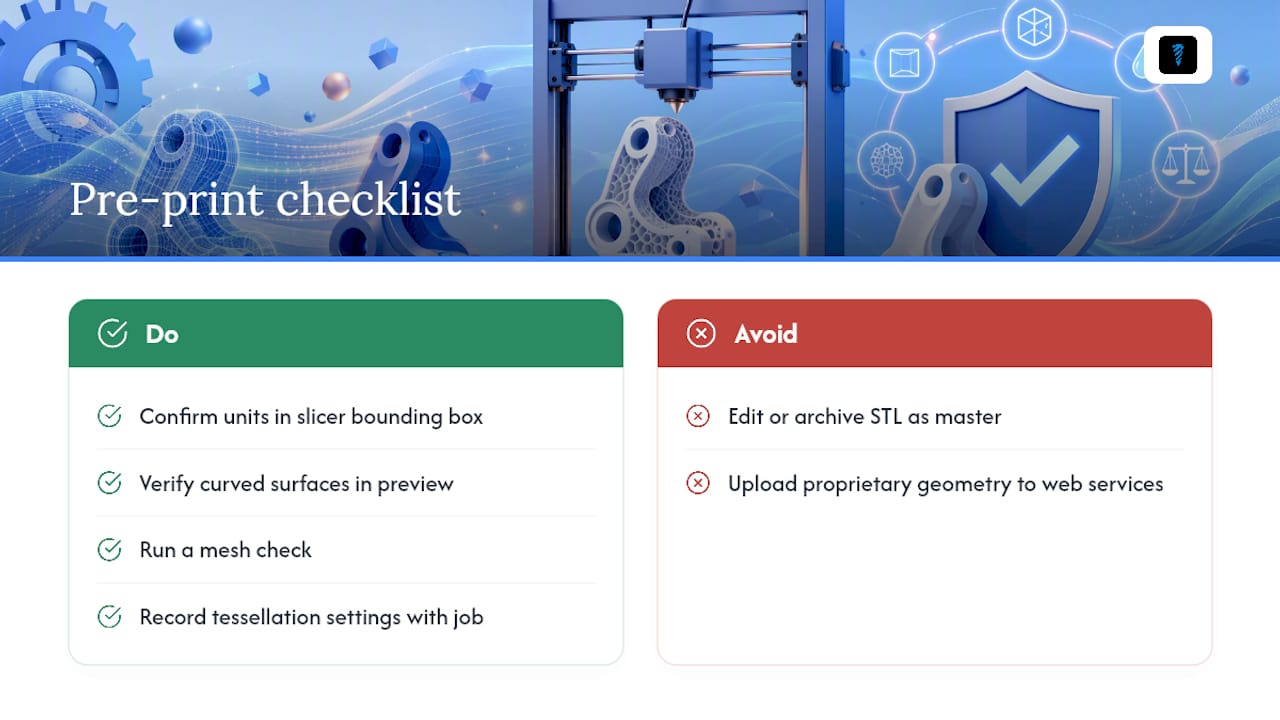
The real discipline is treating STEP and STL as two different things with two different jobs. STEP is the engineering record. STL is a disposable export for one specific print at one specific tolerance. The moment you start editing the STL, or worse, archiving it as the master file, you've lost the ability to make a clean revision without starting over.
In a real shop, the checklist before any print should be: confirm units in the slicer bounding box, verify curved surfaces in the preview, run a mesh check, and record the tessellation settings alongside the job. That last step takes ten seconds and has saved more than a few reprints when a part needed a second iteration.
The other thing worth saying plainly: for anything proprietary, the free web converter is not the right tool. Not because the tools are bad, but because the risk calculus doesn't work. A local or integrated solution costs almost nothing relative to the exposure of uploading a customer's geometry to a server you don't control.
Try Availzye Machinist Pro for your next STEP conversion
If you're ready to move beyond ad-hoc converters, Availzye Machinist Pro gives you a structured path from STEP file to print-ready STL to G-code, all inside one platform.
- Start a 7-day free trial at availzye-machinist-pro.com — no credit card required to test the CAD Viewer
- Open the CAD Viewer to load a STEP file and export binary STL directly
- Use the G-code Wizard to take your converted STL straight to machine output
Pro Tip: Run your first conversion on a part you've already printed successfully. Comparing the new STL's bounding box and surface quality against your known-good file is the fastest way to validate your tessellation settings before committing to a new job.
Useful sources for deeper reference
- DOI: Tessellation and CAD file formats (journal reference)
- STEP to STL Converter — Free, In-Browser, No Upload
- STEP Converter — Convert STEP to STL, GLB, OBJ & More | XConvert
- STEP to STL — Roltec
- STEP to STL File Converter: Free & Online — MeshInspector
- STEP to STL Converter - Free, Private, No Signup | 3D AI Studio
- Linear deflection and angular deflection — OpenCASCADE
- How to Convert a STEP File to an STL File? — Xometry
Availzye Machinist Pro: the integrated solution for shop-grade conversions
Most machinists reading this need more than a one-off converter. They need a place where STEP files live with their job records, where exports are tracked, and where the path from geometry to G-code doesn't involve three separate tools and an email chain.
Availzye Machinist Pro is built for exactly that workflow. The CAD Viewer handles STEP viewing and STL export inside the platform, paired with the Tool Crib for asset management and the G-code Generator for downstream output. Role-based access means your customer files stay inside your team, not on a free web tool's server. Audit logs mean you know who exported what and when.
Start a 7-day free trial at availzye-machinist-pro.com and run your first STEP conversion inside a workflow that actually scales with your shop.